Recent Posts

Red Velvet Oreo Cupcakes

DSC_4351x900I have a secret. Most of my friends and family know this, but I’ve never said it publicly on my blog (at least I don’t think I have). Here it is: I roll my eyes at the thought of red velvet cake. I know, I know. But I DON’T GET IT. It’s cake… with a tablespoon of cocoa powder and a bottle of red food coloring! What is so magical about this?!

I don’t hate red velvet, per se. But I just don’t get it and I think those of you who go all happy jazz hands over it should have your head examined. Having said that, just because I don’t get it doesn’t mean that I’ll never feature it on my blog. I don’t get the appeal of coconut, milk, or carrots either — but hey, I know many of you love them.

Nabisco decided to make red velvet Oreos for the Valentine’s Day season. Apparently they are a limited time only product, so I hope you are able to give them a try before they disappear from the stores. FYI — I found mine at Target.

Red Velvet Oreo Cupcakes
Print Recipe

For the cupcakes:
1 box red velvet cake mix (plus required oil + eggs)
Gold sprinkles
Valentine’s Day decorations (I found the arrows at Williams-Sonoma)
Cupcake liners
1 package red velvet Oreos

For the cream cheese icing:
8 ounces (2 sticks) unsalted butter, room temperature
12 ounces cream cheese, room temperature
1 pound (4 cups) confectioners’ sugar, sifted
3/4 teaspoon pure vanilla extract
A disposable pastry bag + a large star tip

1. Make the red velvet cupcakes according to box directions. Allow them to cool completely before frosting.
2. Make the icing: beat butter and cream cheese with a mixer on medium-high speed until fluffy, 2 to 3 minutes. Reduce speed to low. Add sugar, 1 cup at a time, and then vanilla; mix until smooth. (Can be refrigerated for up to 3 days; before using, bring to room temperature, and beat until smooth.)
3. Pipe the icing onto the cupcakes using a disposable pastry bag and a large star tip.
4. Place one red velvet Oreo on top of each cupcake.
5. Decorate with gold sprinkles + Valentine’s Day decorations.
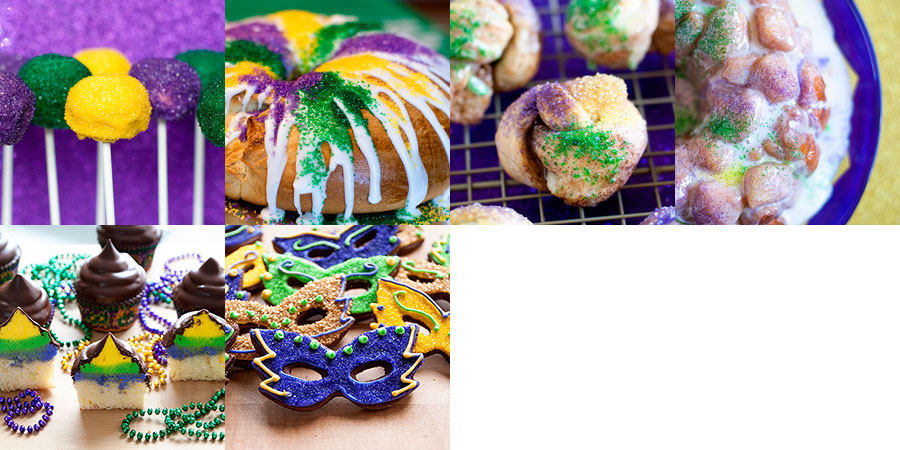

Mardi Gras Ideas 2015

mardisgrasroundup15
Mardi Gras is next Tuesday! Here are some ideas for your celebration!

1. Mardi Gras Cake Pops
2. King Cake
3. King Cake Knots
4. King Cake Monkey Bread
5. Mardi Gras Hi-Hat Cupcakes
6. Mardi Gras Mask Cookies

Mardi Gras Mask Cookies

DSC_3929x900

Mardi Gras is next Tuesday, February 17th! This is not a big holiday here in Wisconsin, but I still try to bake a treat or two each year in celebration. I love the idea of Mardi Gras and I love the colors, so why not? Laissez les bons temps rouler to all those who celebrate!

I made these mask cookies and decided to make a chocolate cookie base instead of my usual sugar cookie. I thought the chocolate would be a bit more dramatic and I love how these turned out!

If you are a new to decorating with royal icing, here are some helpful tips and links:

  • I used a chocolate shortbread cookie recipe, which is listed below.
  • I used a royal icing recipe from Annie’s Eats, which is listed below.
  • If you are new to decorating with royal icing, please visit this post by Annie’s Eats, which will teach you about outlining and flooding.  Bake at 350 is also a great resource for cookie decorating and ideas (I love Bridget’s book, too!).

Here are the specifics on how I made these cookies:

  • I used a mask cookie cutter which I ordered from Amazon.
  • You will need yellow, green, and purple sanding sugar. I found mine at a baking shop here in Milwaukee, but I know that you can find sanding sugars at craft stores like Hobby Lobby or Jo-Ann Fabrics. Or when all else fails, order them online!
  • You will also need yellow, green, and purple food coloring. I always use Wilton’s gel dyes — Yellow, Leaf Green, and Violet.
  • I divided the icing into three bowls, colored the icing, then outlined and flooded each cookie (see the links above if you need assistance with these steps). Before the flooded icing set, I dipped the cookie into sanding sugar.
  • I kept some of the leftover icing and piped detailing on top of the sanding sugar. I used a small round pastry tip for this step.

Chocolate Shortbread Cookies
Recipe source: Two Peas & Their Pod
Print Recipe
2 cups all-purpose Gold Medal flour
2/3 cup Dutch processed cocoa powder
1/2 teaspoon salt
1/2 cup plus 2 tablespoons granulated sugar
1 cup unsalted butter, at room temperature
1 teaspoon vanilla extract
2 cups semi-sweet chocolate chips, melted
Plus sprinkles, disposable pastry bags, and small round pastry tips for decorating

1. Sift the flour, cocoa and salt together. Set aside.
2. In the bowl of a stand mixer, cream together the butter and sugar until light and fluffy, about 3 minutes. Mix in the vanilla extract. Slowly add in the flour mixture and mix until combined. Between two sheets of waxed paper, roll the dough 1/4-inch thick as evenly as possible. Chill for 30 minutes.
3. Position a rack in the middle of the oven and preheat the oven to 350 degrees F. Line a large baking sheet with parchment paper.
4. Cut out the cookies with a cookie cutter. Arrange the cookies on the prepared baking sheet.
5. Bake the cookies for 15 minutes, or until crisp and firm. Let the cookies cool on the baking sheet for two minutes and then transfer to a wire cooling rack to cool completely.

The yield will depend on the size of your cookie cutter. I was able to get about 18 masks out of this recipe.


White Royal Icing
4 cups powdered sugar, sifted
2 Tablespoons meringue powder
5 Tablespoons water

Directions:
Combine all ingredients in the bowl of a stand mixer fitted with the paddle attachment. Mix on low speed until the sheen has disappeared and the icing has a matte appearance (about 7-10 minutes).  Transfer the contents of the mixing bowl to an air-tight container. This will be the stiffest consistency of the icing, and at this point it is still too stiff to use for decorating. Add water a very small amount at a time and stir by hand until fully incorporated. Continue until the icing has reached a consistency appropriate for piping.

You may need to make two batches of this depending on how many cookies you are making and the size of your cookies.

Valentine’s Day Ideas 2015

valentinesroundup15Valentine’s Day is this weekend! If you need sweet ideas, you’ve come to the right place!

1. Tootsie Roll Fudge
2. Chocolate Mayonnaise Cupcakes
3. Red Velvet Cake
4. Pink Ombre cake
5. Pear-Raspberry Heart Pies
6. Mini Cherry Cheesecakes
7. Bee Mine Cookies
8. Red Velvet Cupcakes
9. Neapolitan Rice Krispie Treats
10. Brownie Bites
11. Buckeye Bites
12. Conversation Heart Cake
13. Cherry Chocolate Kisses
14. Heart Cookie Cake
15. Conversation Heart Cookies
16. Black & White Heart Cookies
17. Mini Valentine Cupcakes
18. Conversation Heart Marshmallow Cookies
19. Pink Heart Cookies
20. White Chocolate and Cherry Shortbread Cookies
21. LOVE Cupcakes
22. Love Letter Cookies
23. Pink & Purple Heart Cookies

Love Letter Cookies

DSC_4049x900

Handwritten letters and notes are the best, right? I love technology, the Internet, and social media like crazy, but I am also a huge believer in hand-writing thank-you notes, letters, etc. There’s just something more personal about receiving a hand-written note — knowing that an envelope, a stamp, and the ritual of mailing it were involved. Snail mail and hand-written notes also allow me to justify my shopping trips to Paper Source!

If you haven’t mailed someone a hand-written note in a while, do it this Valentine’s Day season! I made these little love letter cookies to celebrate the season — and they were so easy to do! A simple shape, only one color of icing, and minimal decorating required. Enjoy!

If you are a new to decorating with royal icing, here are some helpful tips and links:

  • I used my grandma’s sugar cookie recipe, which is listed below.  Another good cut-out cookie recipe can be found at Bridget’s wonderful Bake at 350.
  • I used a royal icing recipe from Annie’s Eats, which is listed below.
  • If you are new to decorating with royal icing, please visit this post by Annie’s Eats, which will teach you about outlining and flooding.  Bake at 350 is also a great resource for cookie decorating and ideas (I love Bridget’s book, too!).

Here are the specifics on how I made these cookies:

  • I used a scalloped-edge rectangle cookie cutter. I can’t remember where I purchased mine — sorry!
  • You won’t need any food coloring for these! All you need is a batch or two of white icing (see the recipe below)
  • The first step is to outline the rectangles with white icing, allow the outlines to set, and then flood with white icing. The second step is to pipe the detailing to make them look like envelopes – I used a slightly larger round tip for this step. The third (and final) step is to place a small red heart onto each cookie.
  • The red hearts are a Wilton product — and I found mine at Hobby Lobby. The hearts are red, pink, and white — feel free to use any color, not just the red!

Omi’s Sugar Cookies
Print Recipe
1 cup butter
1 cup sugar
1 large egg
1/2 teaspoon salt
3 cups flour
1 teaspoon baking soda
1/2 cup sour cream
1 teaspoon nutmeg

Beat butter and sugar. Add egg, sour cream, and nutmeg. Add dry ingredients gradually. Chill the batter overnight or for at least 4 hours. Roll out dough and cut with cookie cutters. Bake at 350F until golden (in true fashion, my grandma didn’t give a specific baking time. I baked the cookies for about 8 minutes). The yield will depend on how large your cookie cutter is. I got a couple dozen cookies out of this recipe.


White Royal Icing
4 cups powdered sugar, sifted
2 Tablespoons meringue powder
5 Tablespoons water

Directions:
Combine all ingredients in the bowl of a stand mixer fitted with the paddle attachment. Mix on low speed until the sheen has disappeared and the icing has a matte appearance (about 7-10 minutes).  Transfer the contents of the mixing bowl to an air-tight container. This will be the stiffest consistency of the icing, and at this point it is still too stiff to use for decorating. Add water a very small amount at a time and stir by hand until fully incorporated. Continue until the icing has reached a consistency appropriate for piping.

* Note: you may need more than one batch of icing, depending on how many cookies you make or how big your cookies are.